Colonel Joachim von-Krieg  

Posted by CommissarHarris in ,

I Battalion Command Team

Colonel Joachim von-Krieg
Colonel von-Krieg has been serving with the 291st since the founding of the regiment.  He has participated in the campaigns on Praxedes IV (743.M41); the 1st Tyrannic War (743.M41 to 745.M41) ;  and the H'Rus Incident under Inquisitor Mateus.   He was severely wounded twice during the Praxedes Campaign,  Once by the Tau and once during the Eldar incursion onto that world.  Colonel von-Krieg continues to serve the regiment and is at present organising the regiments withdrawal from Praxedes IV for redeployment to the Normadius system. 

Basing Desert Colours  

Posted by CommissarHarris in , ,

The First of the second Squadron of Vendettas approaches completion. Time to build the Flying Base.  I quite like building the flying bases because they are big enough to get a real diorama onto the base.
One again the Theme is the Campaign for Praxedes IV, an earth like world with a high background sulphur content.  The 291st participated in the heavy fighting in around the desert tropics on the main continent.  So a desert base for me.

1.0: Gather all of the Fixin's for the Base
Materials:

  • Flying Base and stand
  • My Basing Mix (GW Sand: GW Slate chips: GW Slate; Green Scene Rubble Rocks)  
  • Slate Peices
  • Milliput
  • 0.5mm Brass Rod
  • Scatter Materials
  • GW Razor Wire


2.0: Some Preparation
Curl the Wire rod into the Barbed Wire Pailings.  These will be pushed into the Putty later on to hold the GW Razor Wire.
Take the Plastic Base cut a hatch into the plastic with a scalpel.  This gives the putty something to grip.


3.0: Build the Base
Mix the Milliput and push it out thinly onto the base until the whole base is covered.
Press the mixed basing material into the putty.
For the Large Rocks: Push the putty onto the back face of the rocks, then push the puttied face of the rock onto the base.  this ensures adhesion without you having to push the rock deeply into the putty.


Once you have everything pushed on and you are satisfied with the coverage of the basing Mix.  Leave to try.
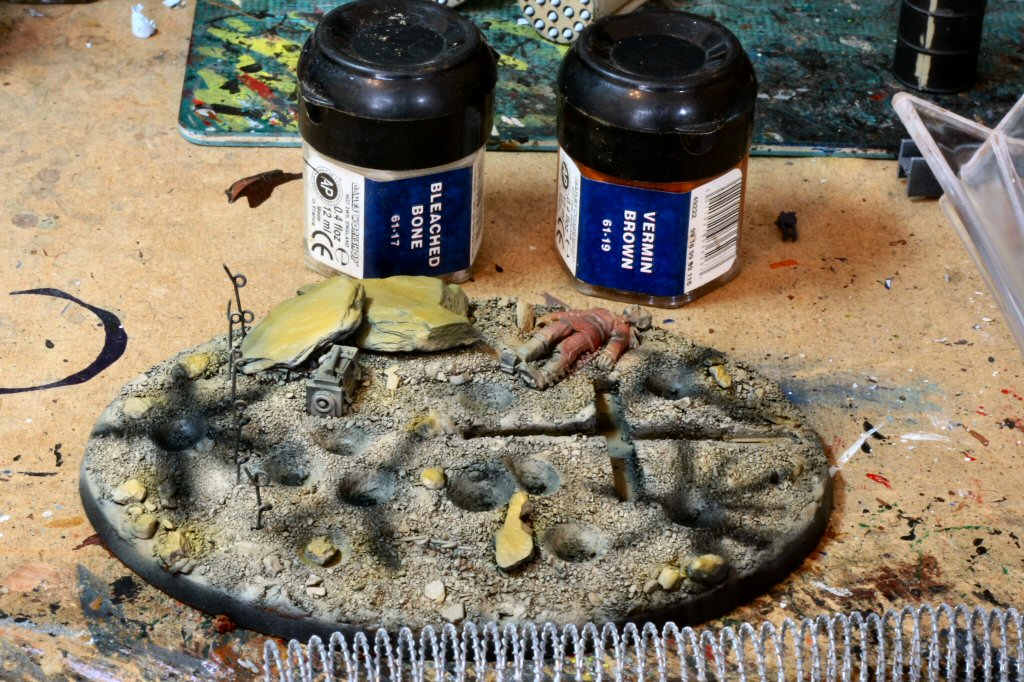
In this case I wanted to show the wire had been recently mortared.  So I used the butt of the Citadael Large Brush to press craters into the putty.


Note the Flying base is not yet affixed to the base.  It is there only to keep the hole for it in the putty open and prevent the putty from shrinking.

4.0: Spray Chaos Black to fix the Basing Mix
Remove the Flying stand and spray Chaos Black.  This helps fix the basing mix onto the putty.

5.0: Spray the Colours of the Earth
I picked a limited palette.  These are very similar to the colours used on the Flyer.

I started with the VMA Dark Green, sprayed all over, then the VMA: Khaki Brown,  Then the VMA: SAND Yellow.  The idea as to create a variation in colour on the base.  The Black grey was sprayed into the centre of the craters and on Radial Lines out from the centre of the crater.
The Rocks were also sprayed with a Colour not shown, that of VMA: Yellow Ochre.


In order to bring the edges up and lighten the whole thing off I decided to dry brush with C: Bleached bone.  also pictured is the C:Vermin Brown for the Pailings and Razor wire.


6.0: Glue in the Flying Stand
With some glue :-)


Conclusion:
I've Skipped the paining of the detail because I basically haven't done it..  I am unhappy with the corpse of the Mordian.  I feel I should be paining it like a regular model.  Instead he's basically the same colour as the base with a red uniform.  Maybe in the future I'll do something about it when I'm a bit more inspired.

Also I think I should add a little bit of yellow/black flock around the base of the rock to break up the rockiness.


Project: Vulture  

Posted by CommissarHarris in ,

Well, its done.  The canopy has been closed up and the final dusting of weathering powder has been added and its ready to play.  The more observant of you will have noticed its already had an outing on the field.  With punisher cannons  mounted, the Vulture  acquitted itself admirably.  It was so successful that my usual opposition declared that the Vulture had just become one of his Priority targets when playing the 291st.


Top Down Exploded View:
The whole weapons range is magnetised and includes: Twin linked multi-laser; Twin linked las-cannon; Twin linked Punisher cannon; and Rocket Pods.

Front Exploded View:

I would like in the future to get the all of the weapons to round out the hard point options in Imperial Armour apocalypse, like the missile launcher.

Flying Stand Right Front Quarter:


Flying Stand Left Rear Quarter:


Flying:

There may be some photo shop involved in this picture ;-)


Well that's it.  That's the Imperial Navy Vulture No. 23 attached to 15th Company 291st Death Korps of Krieg Panzer Grenadiers. If you have read this far I hope you have enjoyed the photo spread.  Next on the workbench is a Vendetta Squadron in the same Praxedes IV colour scheme.

Sunday Gaming  

Posted by CommissarHarris in ,

Back at Bromley battle bunker again, gaming on a sunday because work has precluded any Friday night activities once again.
So today we have a 1750 pt outing against an eldar army by DeathJester.  Both of us are trotting out somthing new this time. He has 3 new D-cannon to try and I have the Vulture on it's maiden flight. We rolled for a game in battle missions and got 'Dawn Raid', a dark eldar mission with me as the attacker and DeathJester as defender. Great piece of luck for me with my guard cavalry army list a perfect proxy for dark eldar.
Oh but the Emperor is a busy man. One minute he is giving you the perfect game setup, the next he is looking elsewhere while the perfidious eldar are stealing the initiative after your scout move has put you in range of a battery of D-Cannons. Still he quickly came back and sorted it out so the eldar managed no damage with their first turn.


By the end of the game the eldar had been smashed. They retained 1stunned war walker and a ranger on the field, whilst the Glorious 291st Death Korps of Krieg, 15th Company still had Graf Krieg and his entire command squad, a Vulture, a slightly damaged Vendetta, and Bastogne and his boys. But he had an objective and so did I. So in the end a draw. 


PS thius will be my last attempt at an emailed iPhone Blog. This bally aticle took took 4 attempts to get up and in the end I have hooked the iPhone up to the PC and did it the old fashioned way.

Project Vulture: Half way there  

Posted by CommissarHarris in ,

A frend of mine has come over and brought his Cannon EOS 500D.  Most of my shots are done using my own, older Cannon EOS 400D with a Macro Lens, so I had to try a few snaps with the new camera as a contrast.
 I thought I'd try a WIP of the Vulture in the new Praxedes IV theater colours, and this is the result.  This camera is very good!  These were taken with the standard 18mm - 55mm lens on autofocus with an appeture setting of F35 and balancing the shutter speed to the available light.

The subject is my WIP vulture in the 291st theater livery for Praxedes IV campaign.  At present its waiting decals and chipping before I get stuck in in with the weathering and filters.

For all Vallejo Model Air thin all paints 3 drops colour: 1 Drop Thinner Unless otherwise specified.

Undercoat Coat:
Spray Can of Citadael Skull white.


The Exterior:
Preshading and base colour
Spray all of the panel ines with Vallejo Model Air Black (Tutorial Part 4b:  Painting Techniques: BF109 Preshading).

Apply the Basic hull colours by filling in the middle of each panel towards the outer edge.
 Top and Side Elevations: 3:1 Vallejo Model Air Sand Yellow to Vallejo Model Air :Ochre
 Belly Elevation: (3:1 Vallejo Model Air Pale Blue

Camoflage
Apply Spots of Vallejo Model Air: Burnt Umber in a random pattern


Squadron Markings Colours:
I masked the boom rings and sprayed them VMA:white.  Give the white some time to dry and mask off the White Sections with Tamiya 10mm Mask.  this leaves a perfect 1 mm strip on either side of the boom rings, I sprayed these VMA: Red to get the red pencil stipes on the outside of the boom.


The Cockpit Interior
Using this tutorial link as as a guide

Base Coat: Black Grey
Panel Lines/ Stains thinned Black /Brown Mix sprayed
Further Panel line definition by Oil wash of Black/brown
Detailing: Lead pencil to highlight the edges of crew contact areas with a metalic tinge

The Crew:
The Crew are a bit stuffed up on this model.  I painted citadael Space Wolves grey on the armour with the intention of using Citadael: Badab Black washes to give the unpainted Iron effect used on the Krieg granadiers.  But it didnt work very well.  The uniforms are VMC: Luftwaffe cam green with with a white helmet.


Key
VMA: Vallejo Model Air
VMC: Vallejo Model Colour
VGC:  Vallejo Game Colour
C: Citadael
AOC: Windsor Newton Artists Oil Colour
CW: Citadel Wash

Saturday gaming  

Posted by CommissarHarris in , ,

Playing at games workshop Bromley today. I played two games from the new battle missions book. I chose 'War of Attrition' and my opponent (Death Jester) chose 'Pre Emptive Strike'. I lost both games. The first game was a close run thing right up until the end two turns. Turn one I smashed all of the Eldar tanks, wiped out the rangers, shattered the bike squadrion and wrecked half the walkers.  At the close of turn 3 every vehicle on the table was a smouldering wreck.  The Bailed out Wriath guard wrecked both of the Vendettas with gunfire and assaults. At the end of the game it was grenadiers vs wraithguard, which is not much of a contest.  My troops ended up cycling onto the board a couple of times each, guaranteeing the Eldar victory.  Without the Bane wolves, getting rid of the Wriath guard was nigh on impossible.
The second game never came together for me. My HQ started the game standing out in the open and was  anihilated with extreme predjudice in the first turn. The banewolves didn't turn up on the board until turn five and even then arrived on the wrong flank. 
My opponent very skillfully arrived at every fire-fight on the board with maximum concentration of his army, usually facing desultory fire from one or two of my units. Both fun games though and I probably learned slot more from the second game than the first.

New Posting  

Posted by CommissarHarris in , ,

The 291st have a new posting!  747.M41 the Regiment arrived on  the world of Praxedes IV, a world under seige.  Tau symparthisers had invited the Tau empire to annexe the world. This had lead to its inclusion as a target for the Damoclese crusade.  With the crusade winding down the 291st, fresh from the withdrawl form the sept world of H'Rus, were redirected to the campaign to retake Praxedes.

Praxedes itself is a brown orb, too close to old father Praxedes to maintain a verdant biosphere, and made up of entirely too much sulphur for full terra-forming.

The Regiment was thrown into the battle almost immediately upon arrival. No time was allowed for theater aclimatisation, or re-equipping for the enviroment.  This saw the regiment fighing its first few encounters in the traditional Krieg black.  It wasn't until after its first 100 days of fighting that units started to be re-equiped with uniforms more fitting for the hot, barren enviroment of Praxedes IV.

In otherwords, I have decided to go for another colour scheme, a desert colour scheme, and to the releif of my wife, a brighter colour scheme.  Fo years she has lamented me "paining things black", so the new buff coats are much better in her opinion.
The method I have chosen it paint these is a hybrid of Airbrush and Brush applied washes.  I've seen a few desert painted Death Korps armies around but it was Ishkurs method that caught my eye the most.  He had some stunning guardsmen up on his site and a very simple recipie for producing them.  He is spraying white basecoat, then , then brush coating them with devlan mud and Grypone Sepia washes to achive some incredible results.
I thought to myself I could do that.  I still wanted a darker finish that he is producing, so I varied the method a little.

So here goes:
1:      Pin any grenades, Packs, democharges or other belt equipment to the body of the Grenadier
2:      Primer the body and arms with Halfords Primer "Grey" Spray

3:      Spray GW Black as an undercoat
4:      Pin the arms to the Grenadier
4b:    Superglue the power cable to the powerpack then using a hair dryer on hot setting, blow dry the power cable until it is soft enough to pull into the slot under the hellguun ans superglue in. 
5:      Using an airbrush, spray ValejoAir: Sea Grey (Much like C: Astronomicon Grey) from a high angle.  this is to try and leave shadowed areas still black
6:      Wash the Steel in CW: Badab Black (4 -5 layers I think)
7:      Wash the Storm coat in CW:Gryphonne Sepia (5-6 layers I think)
8:      Wash the trousers in CW:Devlan mud (2-3 layers I think)
9:      Drybrush the storm-coat with 1:1 C: Snakebite leather and C: Bone White
10:    Paint the leather webbing C:Bestial Brown
11a:  Paint the Face plate of the Gas mask C:Astronomicon Grey wetted out 1:1 with water
11b:  Edge the Steel with White or C:Space Wolves Grey to get the light glinting of points in the armour.
12:    Wet down V:Blood Red and wash it into the eye peices.

And your done.....
I love this method, I lined up 30 Kreig grenadiers all completely assembled and equiped  using step 1 thru 4, then powered through steps 6 thru 9 on all thirty models in one evening.  A few more evenings of detailing where it was needed (powerswords and brass work on the Grenade Launcher ammunition etc) was all that was left and I had 30 New Grenadiers!

Applying this to the Drax Method of Army planning you can see I went from a standing start to my infantry compliment mostly complete!


Next, some Vendettas, This will be like Project Valkyrie Rebooted with Desert Colours.  I did Finish the Squadron of Navy Grey coloured Vendetta's, but Now I want to re do them in a Panzer Yellow colour.